If you are in a Marketing or Sales team, email prospecting may be one of your favorite channels!
You know all the best practices for writing a good prospecting email, but something still bugs you? Your deliverability rate and your opening rate are lagging! 😡
⚠️ Spoiler alert: neither will ever reach 100%.
On the other hand, 4 essential topics can help you approach them: Custom Domain, SPF, DKIM, and DMARC.
We'll explain what they are, but especially how to set them up! Follow the guide 😁
Protocoles SPF, DKIM, MARC... What's that ? 🤔
Before you get your elbow grease, a little general knowledge. 🤓
What's a Tracking Custom Domain, and why setting it up?
To understand this, you need to know how the tracking of email openings works at the base.
The opening acknowledgment works in the same way for all emailing services: a small invisible tracking pixel is stored in each email. As soon as the recipient opens the email, he downloads this pixel. So, you receive a notification when the recipient has opened the email.
If you do not configure your custom domain, this small pixel is hosted on a shared server of the emailing solution you use. However, among these people, there are inevitably spammers and other black hats! 😈
The problem is that when a mailbox receives an email with an acknowledgment pixel hosted on a server with a bad reputation (and you can't do anything about it), your email can end up in spam/promotions, etc.
And this principle is the same when you have clickable links in your mails: the mailboxes automatically create redirection links hosted in shared servers....
... EXCEPT if you configure your Custom Domain!
You will have understood it: configuring your custom domain is an obligation to have a good deliverability and a reasonable opening rate 😜
How to configure custom domain tracking?
Here is how to configure the Custom Domain using the example lemlist.
At your domain host (GoDaddy, Namecheap, Gandi, OVH, etc.), go to:
Settings > Concerned domains DNS Management > add record :
- Type: CNAME
- Subdomain name: track
- Value: custom.lemlist.com
- TTL: default
When you have registered the CNAME (and waited between 1h and 48h depending on your host), find the Custom Domain section in the settings of your email platform.
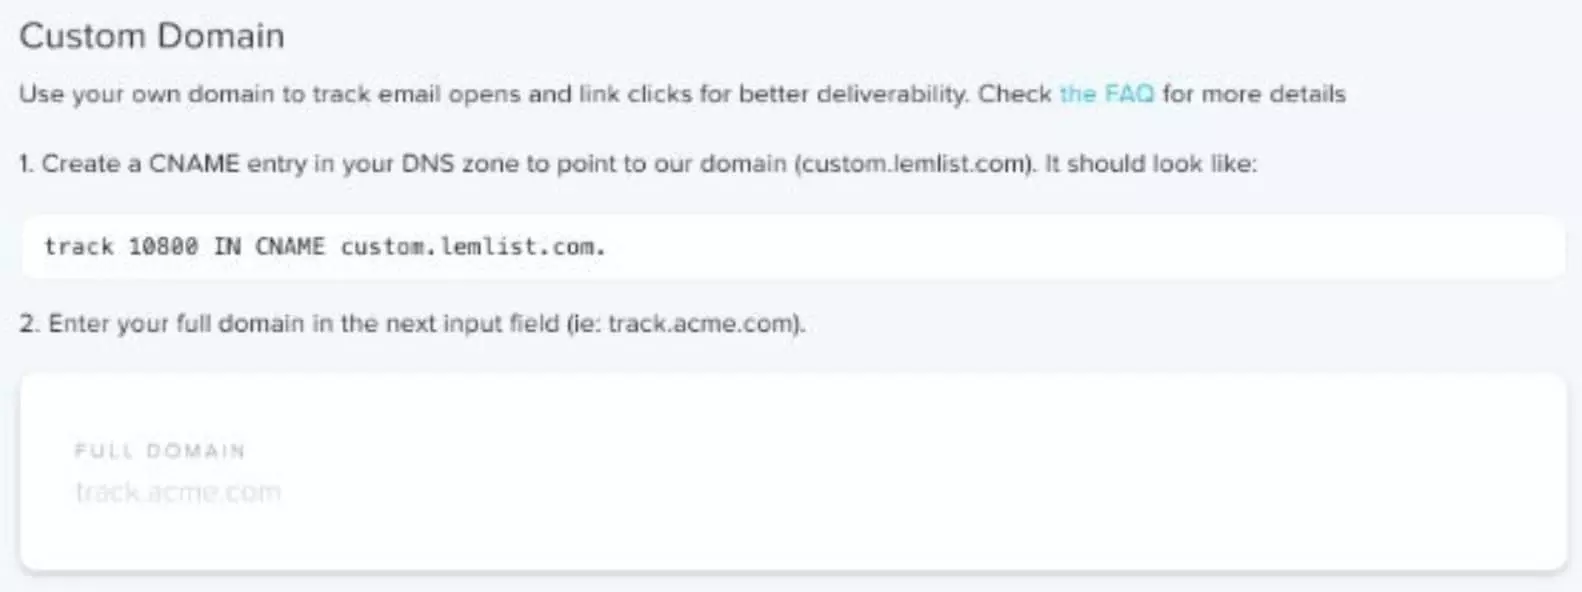
...Enter the CNAME that you have generated at your host and your domain. You can check if it works by simply copying and pasting the domain into your browser.
We show you the same approach on the hosting side in this article for OVH, Gandi, GoDaddy, 1&1, and Namecheap 😜.
The SPF protocol
SPF (Sender Policy Framework) is a protocol that guarantees and certifies the original IP of an e-mail. It tells the recipient servers which IP addresses are allowed to send emails from you.
The SPF protocol, therefore, protects your identity, reputation, and emails from spam.
DKIM protocol?
DKIM (DomainKeys Identified Mail) is a cryptographic authentication standard for email. 🤓
Translation: DKIM is a digital signature that ensures that emails are sent completely: sender verified, content not altered.
This DKIM protocol effectively fights against interception and/or modification of a message when it is sent (you may have heard of "man-in-the-middle" attacks).
The DMARC protocol: the last step to ensure the good deliverability of your emails
DMARC (Domain-based Message Authentication Reporting and Conformance) standardizes the way recipients perform email authentication using SPF and DKIM mechanisms.
DMARC allows you to:
- make sure that no illegitimate address spoofing occurs on your domain name
- improve email deliverability: legitimate emails from your domain are more likely to arrive in your inbox.
Before you start: get the necessary information from your email provider 📨
Most emailing services will accompany you to :
- generate an SPF record
- generating a DKIM key
- generating a DMARC record
For the SPF record
For DKIM keys
For DMARC recordings, the whole process is available on Google support.
Your email provider does not support the creation of records? 😢
No panic! There are generators online:
For the SPF record
For the DKIM standard
For the DMARC standard
For the rest, it's done on the side of your domain host (OVH, Gandi, GoDaddy, Ionos, etc.) 👇
Let's go! 🤓
Google Workspace: SPF, DKIM et DMARC configuration
⚠️ Google Workspace is an emailing service, not a domain host. But since many of you use this service to do cold emailing, we'll make an exception and show you in detail how to retrieve the records you need!
Google Workspace: Generate your SPF record
You must be an administrator of the GoogleWorkspace account
The first thing to do is to go into the settings on the side of his host. The path varies significantly depending on the host, but generally, the approach is as follows:
Settings > My Domains > DNS Management > Add DNS
Once arrived here, there are 2 cases 🧐 .
You already have an SPF record with your domain host.
In this case, you must include this text in the DNS record:
Where? just before the termination mechanism (~all or -all or ?all) in the SPF record. You will get something like this:
There is no SPF registration with your host.
Then create one! To create an SPF record, go to the DNS settings of your web host and create a record with these settings :
- Type: TXT
- Host/Name/Alias: @
- Time To Live (TTL): default
- Record value: v=spf1 include:_spf.google.com ~all
It usually takes 48 hours for the new SPF record to be considered.
🧐 For more information, visit Google Help on SPF records
For DKIM, it's almost as simple: you need to generate the DKIM key on Google Workspace (ex GSuite) and then publish it to your domain host. But before doing so, consider generating a CNAME record on the side of your host.
You must be a super-administrator of the Google Workspace (ex GSuite) account for this step.
To create a DKIM record, you must first have created a CNAME record.
The first step is to create the DKIM key for your domain. First, log in to Google Admin go to the Gmail area of Google Workspace (ex Gsuite):
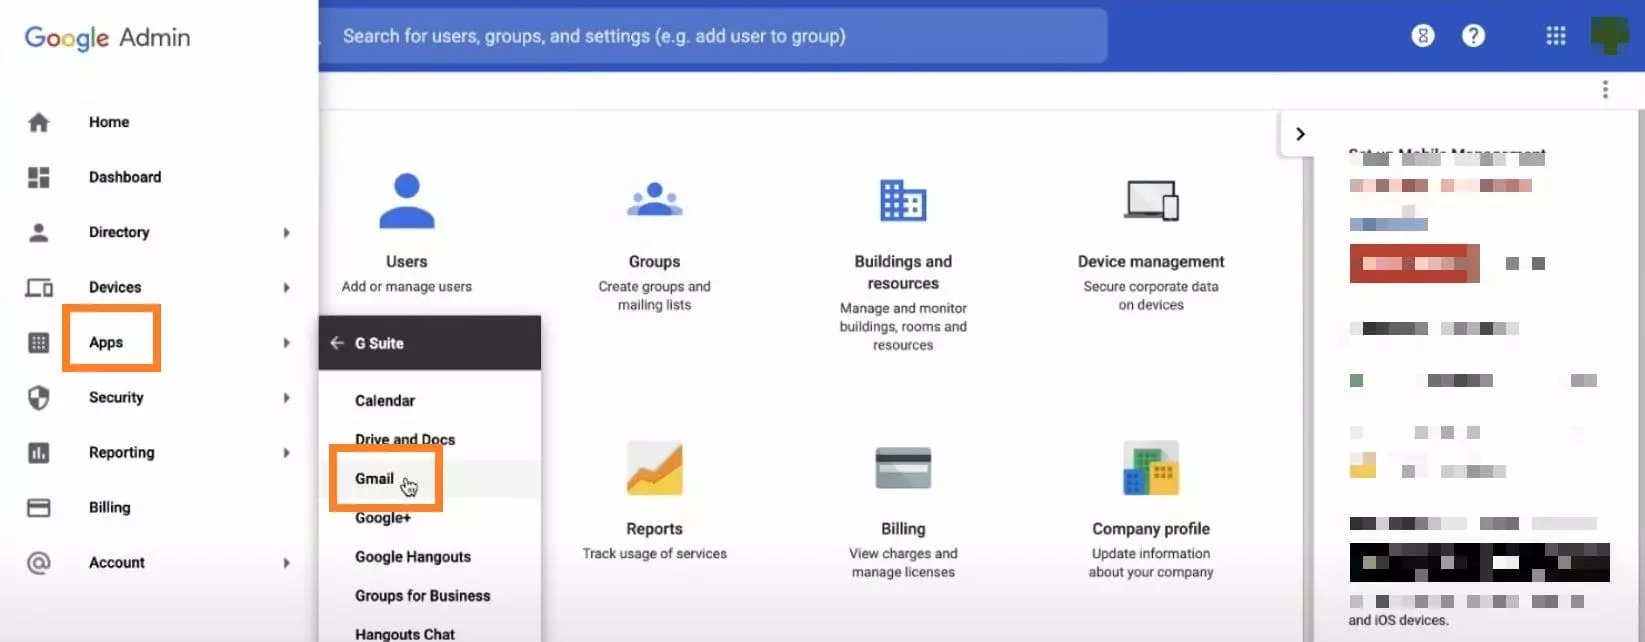
Then, scroll down a bit and click on Authenticate email, choose the domain and click on Generate new record:
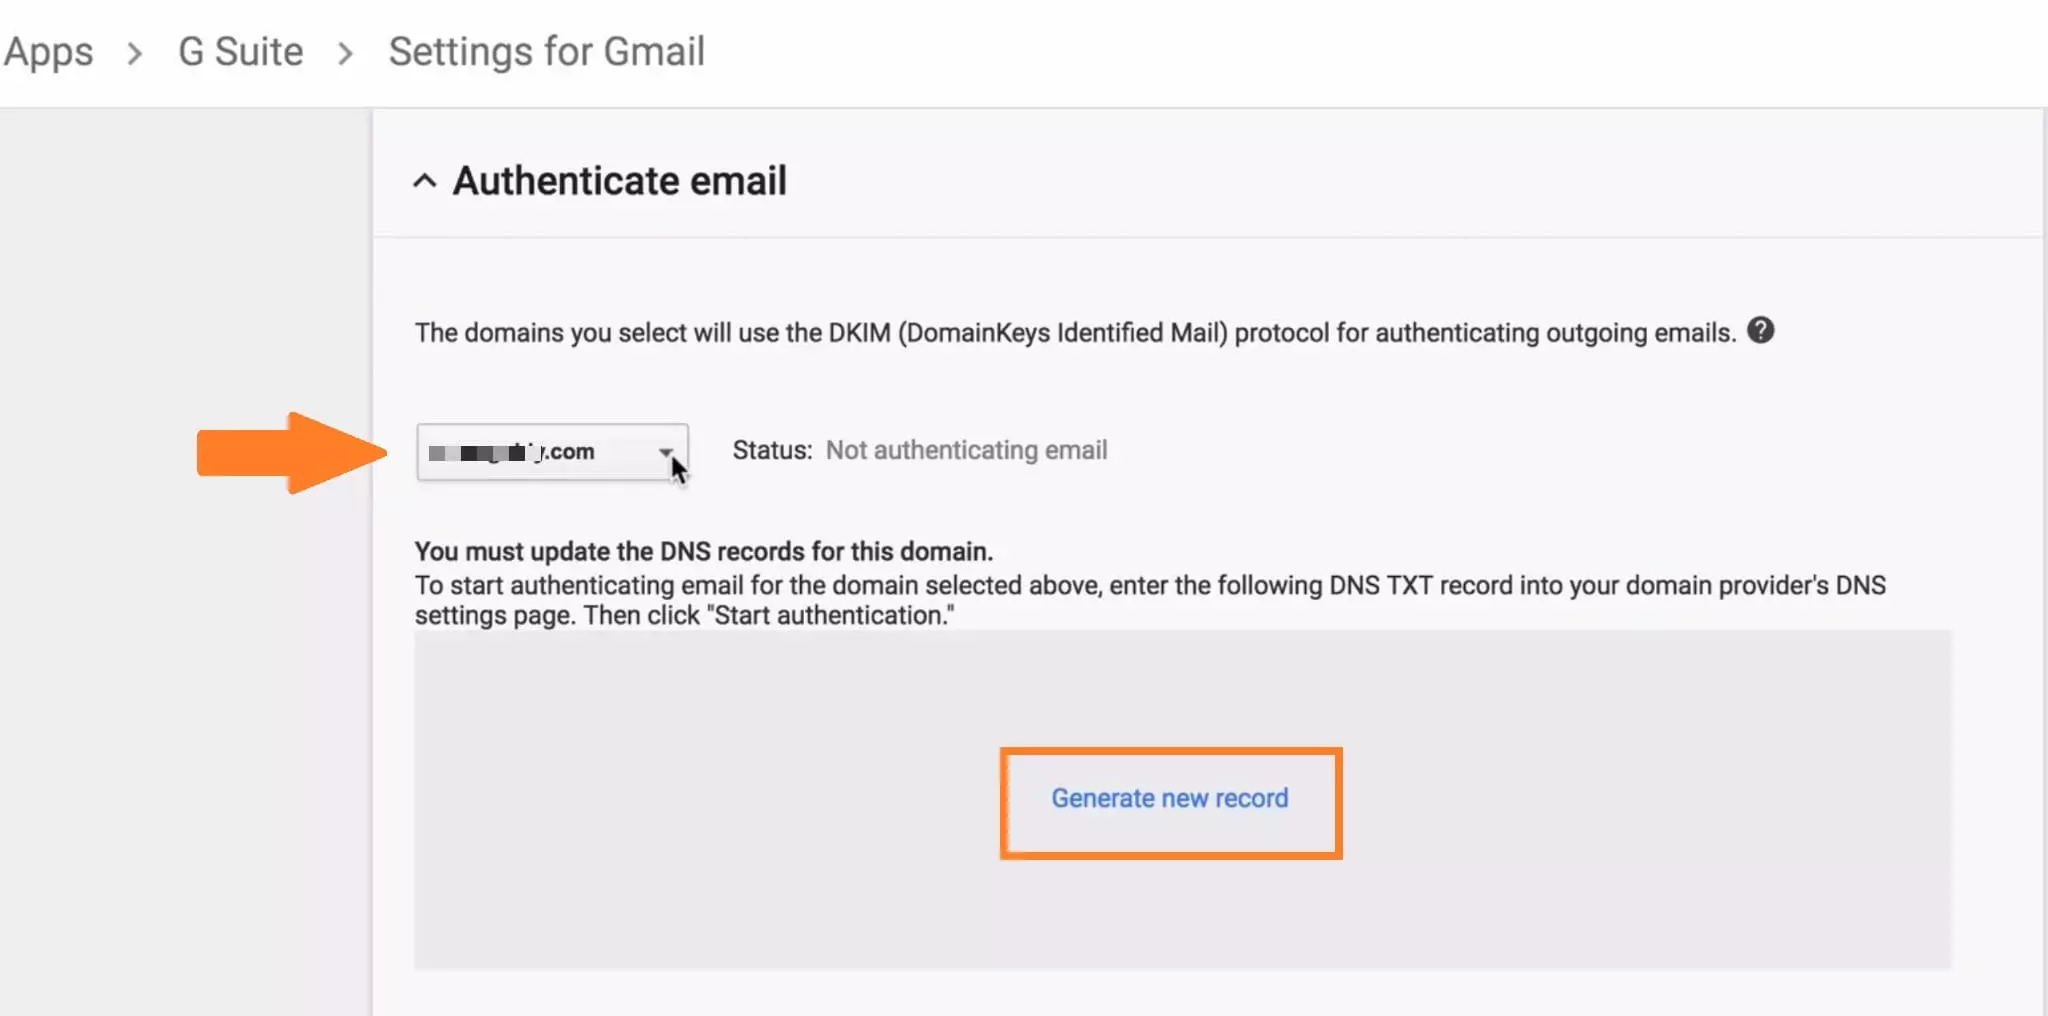
Once in Generate New Record :
- Selecting the number of bits: choose 1024 by default (not all hosts are compatible 2048 → contact them directly for more information)
- Prefix selector: keep "google" unless you already have an active DKIM key that includes "google".
Then click on Generate and... here you go! Here is your DKIM key:

It is these 2 pieces of information (DNS hostname and TXT record value) that you will need on the host side to create the DKIM record!
At your web host, the path to copy/paste your key is often the same: Settings > My Domains > DNS Management > Add DNS
Please note that the authentication with your host can take up to 48 hours. Authentication is effective as soon as" Authentication email ✅" is displayed in the Authenticate email tab:
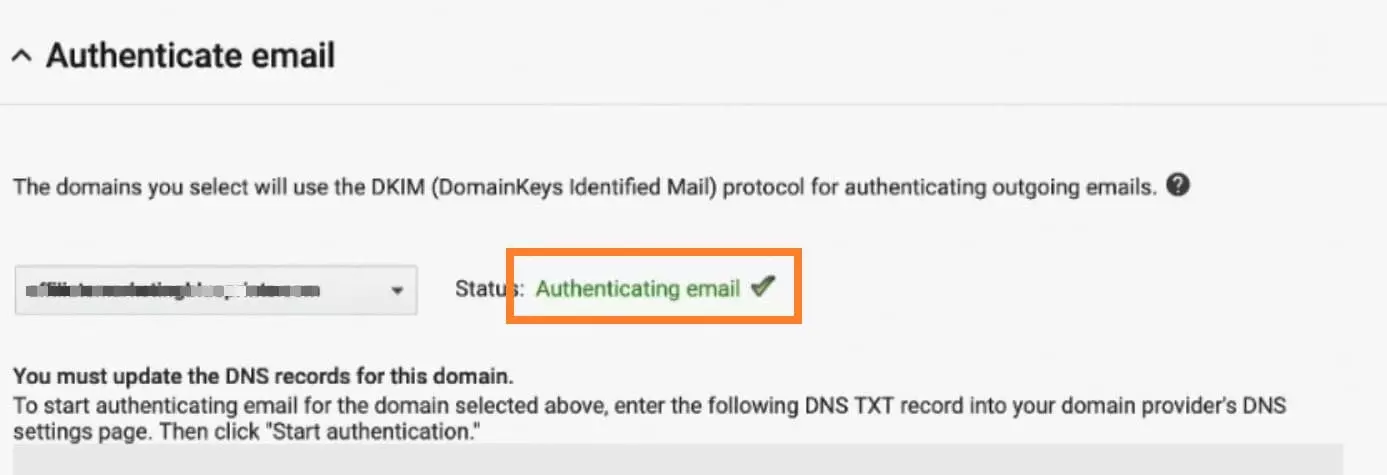
More information on the Google support 😉
Google Workspace: configure your DMARC
Before you start implementing DMARC, make sure that SPF and DKIM are properly configured.
In your hosting provider's settings, go to Add DNS record and click Add Record. Fill in the following fields:
- Type: TXT
- DNS hostname: _dmarc.example.io (replace "example.io" with your domain)
- Value:
(replace "exemple@exemple.io" by your email)
It is advisable to deploy the DMARC standard progressively using the p and pctvariables. Full details at the bottom of the Google support page 😉
Verify that SPF, DKIM, and DMARC registrations are working
Once you have configured your DNS records, you will need to check if everything works!
Check directly in the content of your emails
You can make sure that your SPF, DKIM, and DMARC signatures work by looking in your email header. Let's take the example of Gmail. Take an email and select View Original:

Then, copy the header and paste it entirely into the Mxtools Email Header Analyzer tool. Start the analysis and you will see directly if your records are correctly configured!
Check that your SPF, DKIM, and DMARC are working via online checkers
There are also other online tools that allow you to check your SPF, DKIM, and DMARC.
Check SPF record
Go to Mxtoolbox and insert your domain in the search bar:

If your SPF is working, you will see your registration on a green background:

Check DKIM registration
Check your DKIM registration on by entering your DKIM selector and then your :

If your DKIM is working, you will see this result :

Check DMARC record
As with DKIM, you can check your DMARC on Mimecast by entering your domain in the search bar.
Now, let's move on to the host side!
Gandi: Configure Custom Domain, SPF, DKIM, and DMARC
Gandi: Configure the Custom Domain
To set up the Custom Domain, you must create a CNAME (Canonical Name) record.
How do I set up a CNAME record?
In your Gandi dashboard, click on the Domains tab (the blue sphere at the top left), then on DNS Records, and finally Add, at the top right:
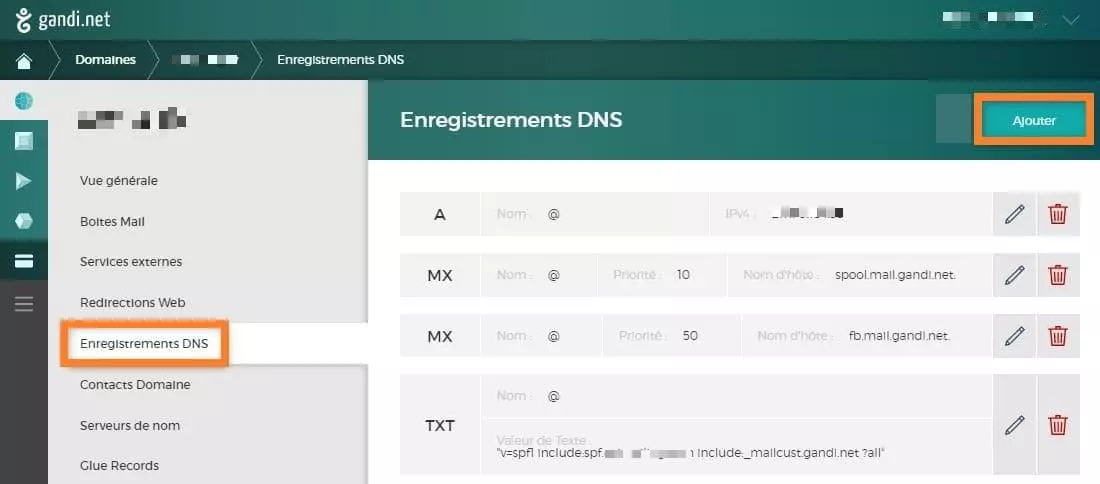
You can now create a record. Select one:
- Type: CNAME
- Name: enter the sub-domain of the URL whose alias you want ("track" for custom domain tracking, www, info, etc.).
- Value: Enter the domain whose alias you want to use.
Click on Send, then Send Changes.
Now go to the Custom Domain section of your emailing service and add the CNAME record and domain name!
More information on Gandi's FAQ
Gandi: Configure the SPF
In the dashboard > click Domain. Once in Assets, choose the domain to configure.
After clicking on DNS Registrations, there are two possibilities:
There is already a record starting with v=spf1. So it's an SPF.
Click on the pencil in Enter text, insert the include rule provided by your email provider (example: include:spf.example.io) between the last include command and the ~all (or -all or ?all) command.
Then save it!
There is no SPF registration. It must therefore be created.
Click on Add:
- Type: TXT
- Name: @
- Enter a text: Copy/paste the text retrieved from your email provider which should look like this :
- Click on Create and save.
That's it. You're there! 😁
Gandi automatically adds quotes around the added SPF. Don't panic, it's normal 😁
For more information, Gandi has an SPF recording section
Gandi: Configure your DKIM signature
To create a DKIM record, you must first have created a CNAME record (see above).
Once you have retrieved your DKIM key from your email provider, log into your Gandi account.
On the sidebar, go to Domains and select the desired domain, then DNS Registration, then Add in the upper right corner:

Click on Add:
- Type: TXT
- Name: copy/paste the DNS Hostname delivered by your email provider.
- Enter a text: copy/paste the DKIM key delivered by your email provider.
For more information, please see the Gandi or Oximailing FAQ.
Configure your DMARC signature on Gandi

Still in the DNS Records panel, click Add:
- Type: TXT
- Name: _dmarc.example.io (replace "example.io" by your domain)
- Enter a text:
Not so complicated? 😁
It is advisable to deploy the DMARC standard progressively using the p and pct variables. Full details at the bottom of the Google support page 😉
OVH: configure Custom Domain, SPF, DKIM and DMARC
OVH: Configure the Custom Domain
You must create a CNAME (Canonical Name) record. Otherwise you won't be able to configure DKIM or DMARC!
In your OVH control panel, click on the relevant domain in the left banner, then DNS Zone, then Add entry
.webp)
This dialog box appears:

Fill in the following information:
- Subdomain: the prefix you want to use (track for the tracking CNAME, etc.)
- TTL: Default
- Target: the area concerned by the setting up of CNAME
Now go to the Custom Domain section of your emailing service and add the CNAME record and domain name!
Set the SPF on OVH
Once in the OVH customer area, click on Domains in the left-hand service bar and choose the domain concerned. Then click on DNS Zone:
Here are two scenarios:
.webp)
It already has an SPF record (it starts with v=spf1).
In this case, you can modify it by adding a line to the record in question:
insert the include command (for example: include:spf.example.io) retrieved from your email provider between the last include command and the ~all (or -all or ?all) command of the current record.
There is no SPF record.
Click on the Add Entry button and complete the fields:
- Add an entry to the DNS zone: TXT
- Subdomain: (optional)
- TTL: default
- Value: Copy/paste the generated record to your email provider. In general, it looks like this:
According to OVH, DNS modification takes effect after 4 hours to 24 hours.
More info on OVH support 😉
OVH: Configure your DKIM signature
To create a DKIM record, you must first have created a CNAME record.
Still, in your DNS settings, click Add Entry. Then choose the TXT field in the dialog box that opens and fill in the fields :

- Subdomain: copy/paste the value indicated by your email provider. it looks like this: example._domainkey
- TTL: Default
- Value: copy/paste the DKIM Key generated by your email provider. If it doesn't, other sites will do it like DKIMcore.
You will find the subdomain value and DKIM key at your email provider. The path is often the same: Settings > My Domains > DNS Management > Email Authentication
Finally, save and confirm 😉
OVH: set up your DMARC record
To set up a DMARC signature, it is essential to have configured the DKIM beforehand.
Still in DNS Zone and after clicking on Add Entry:
.webp)
Fill in the following fields:
- Add an entry to the DNS zone: TXT
- Sub-domain: _dmarc
- TTL: Default
- Value:
Click on Next, then Validate. That's it! 😍
It is advisable to deploy the DMARC standard progressively using the p and pct variables. See the bottom of the Google support page 😉 for more information.
1&1 (Ionos) : Set up SPF, DKIM et DMARC
1&1 : Set up the Custom Domain
Log in to your IONOS account. Then, go to the section Domains and SSL and choose the domain name concerned, then DNS management via the settings wheel :
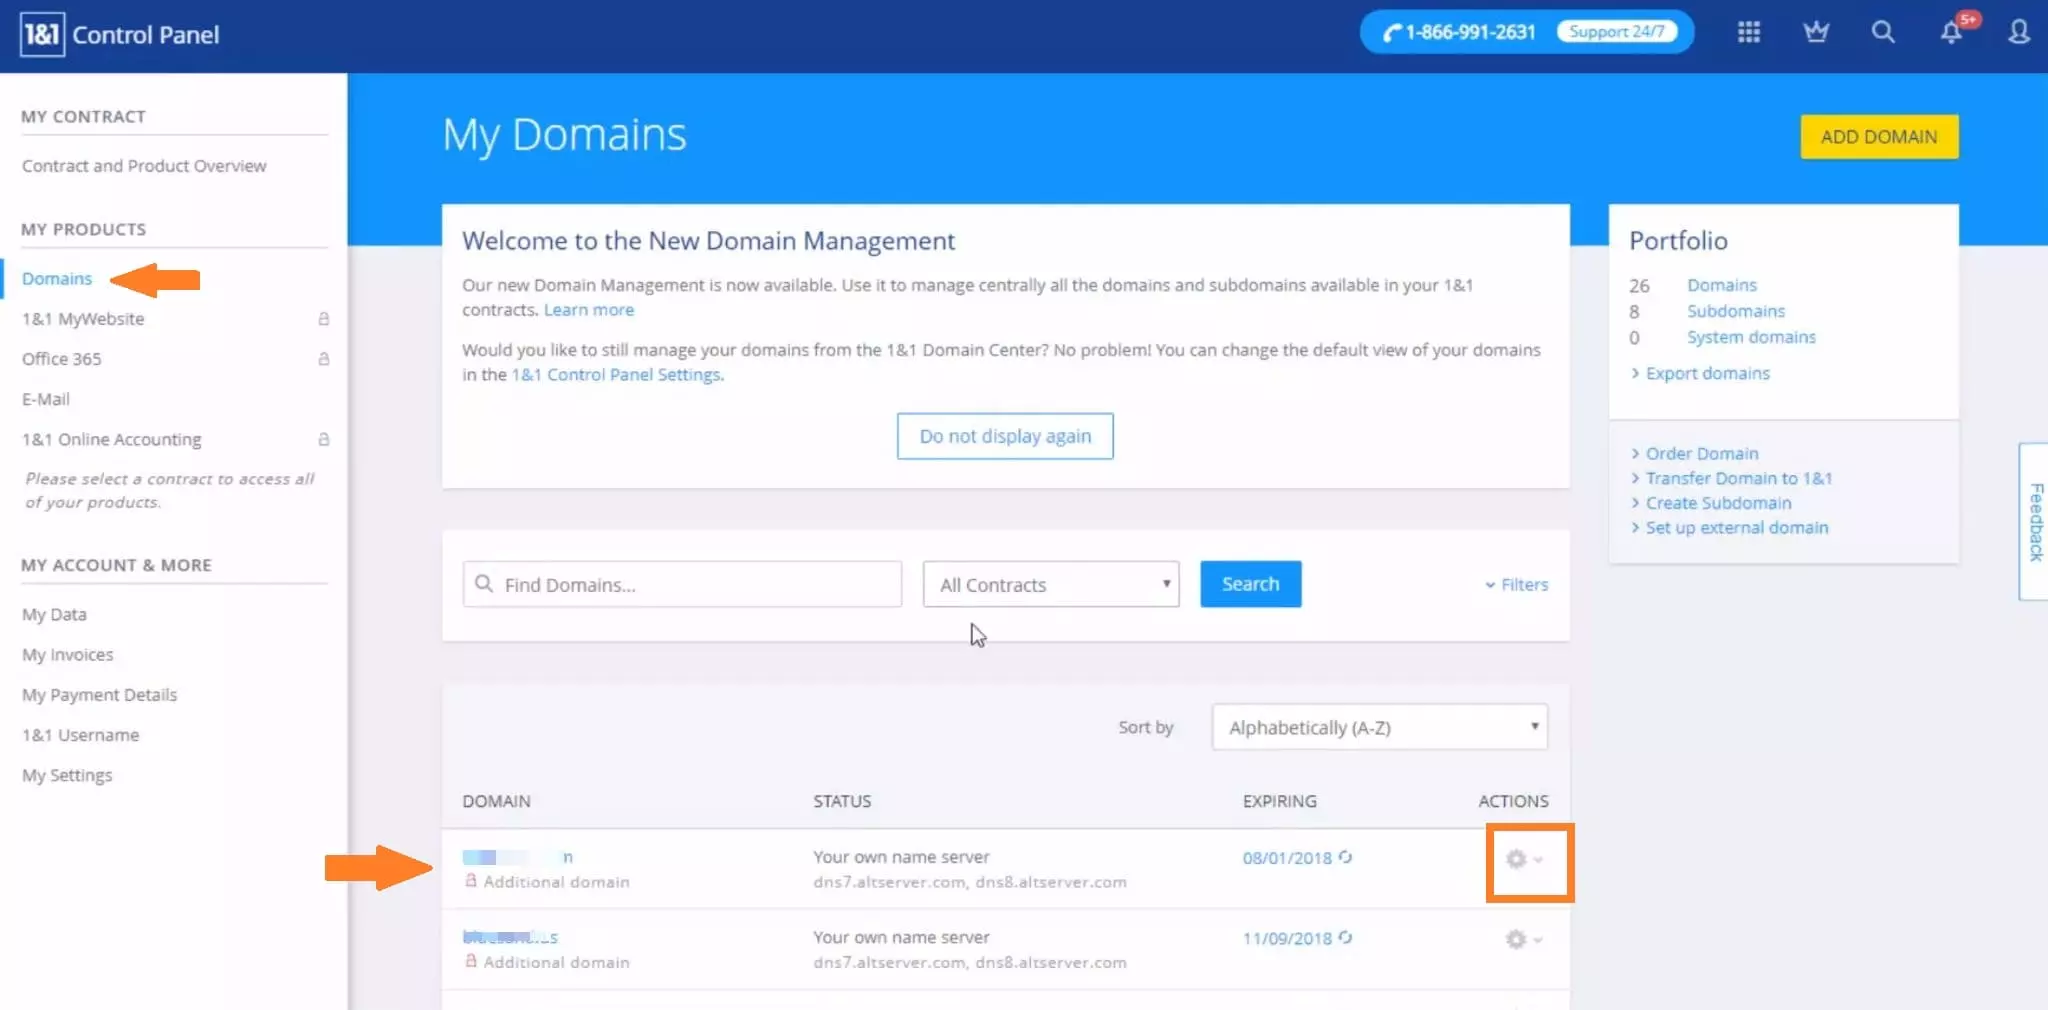
Once you have entered your DNS records, click Add and fill in the fields:
- Type: CNAME
- Host name: enter the sub-domain of the URL whose alias you want (track for CNAME tracking, etc.)
- Points to: Enter the domain whose alias you want to use.
The change takes effect immediately, but it can take up to an hour to synchronize, according to Ionos.
Save. That's a wrap.
Now go to the Custom Domain section of your emailing service and add the CNAME record and domain name!
1&1 : Set up the SPF record
Log in to your IONOS account. Then, go to the section Domains and SSL and choose the domain name concerned:

As shown in the screenshot, go to Actions and open the settings wheel, then click DNS Management :
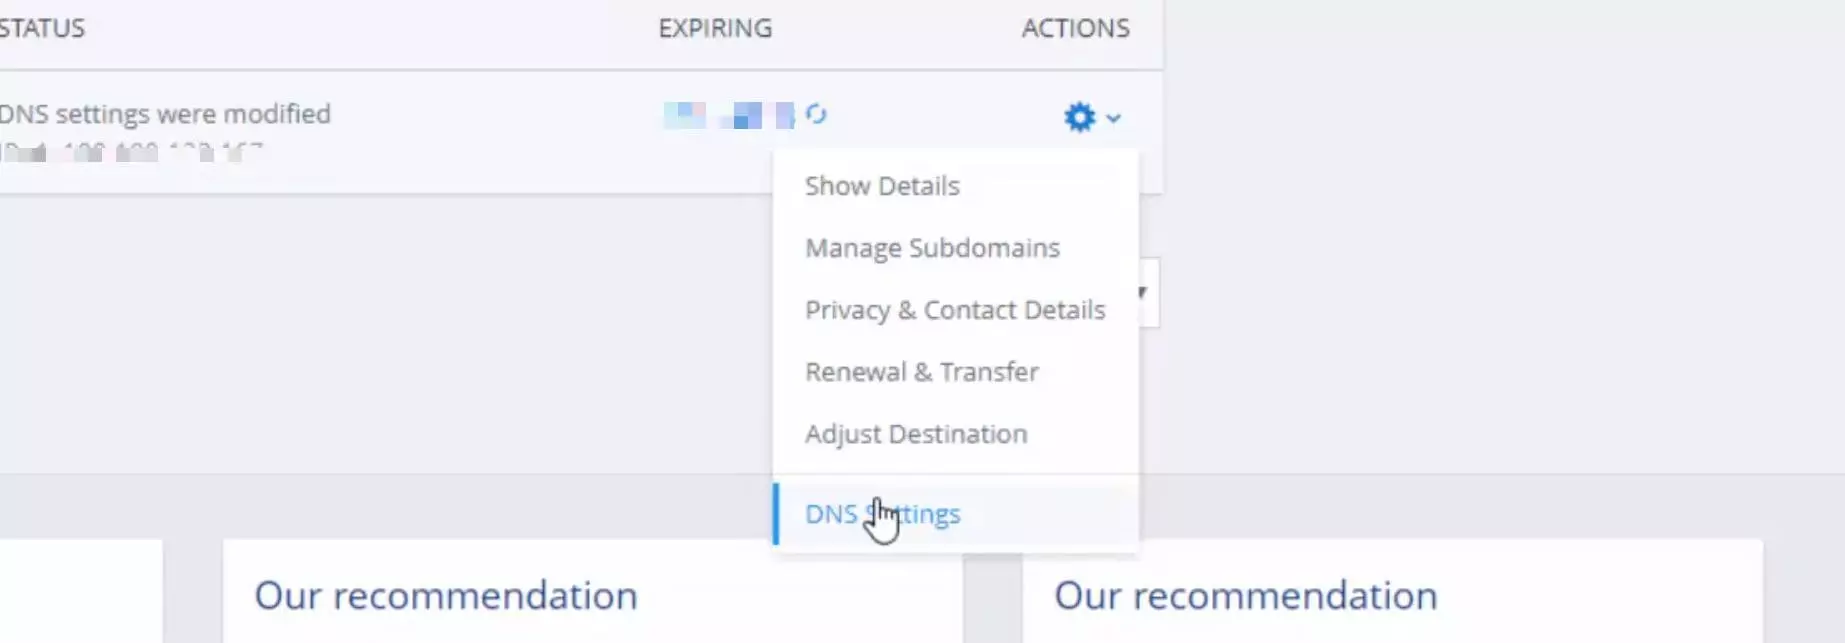
Scroll down and you will see all your DNS records:
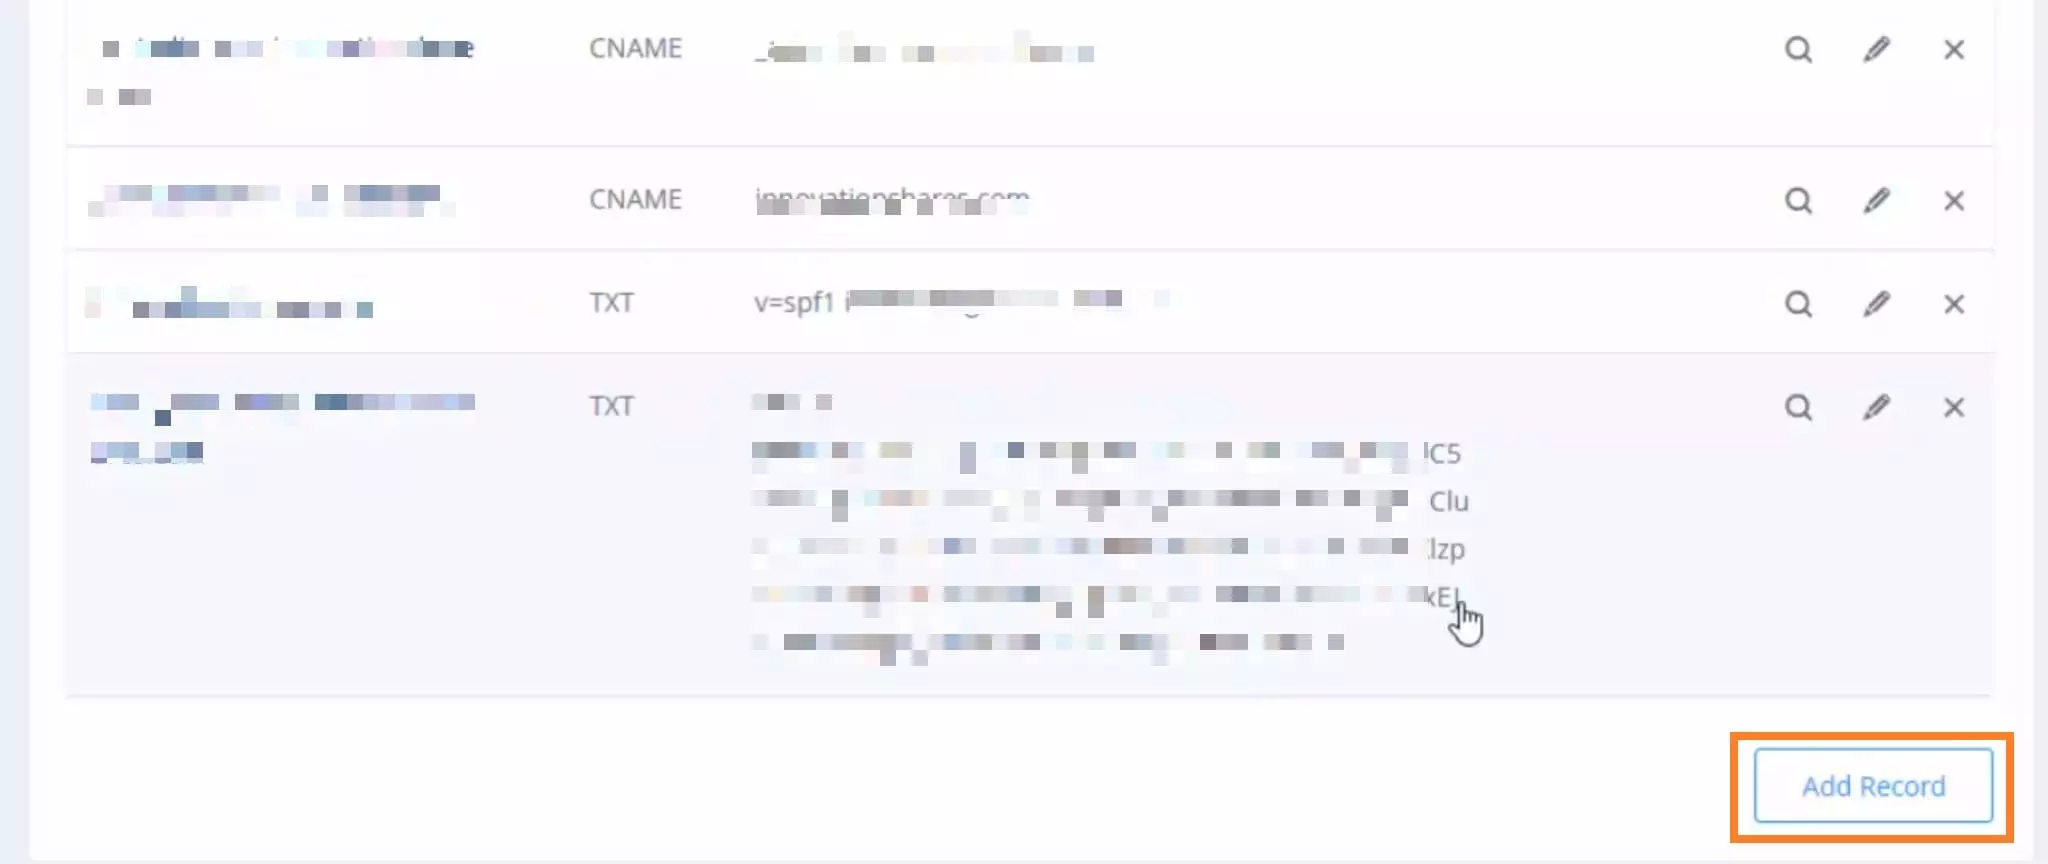
Here, 2 possibilities:
An SPF record already exists (it is of type TXT and starts with v=spf1)
Click on the pencil in then insert the include rule provided by your email provider (example: include:spf.example.io) between the last include command and the ~all (or -allor ?all) command.
There is no SPF record.
Click Add Recording. You will see this dialog box:
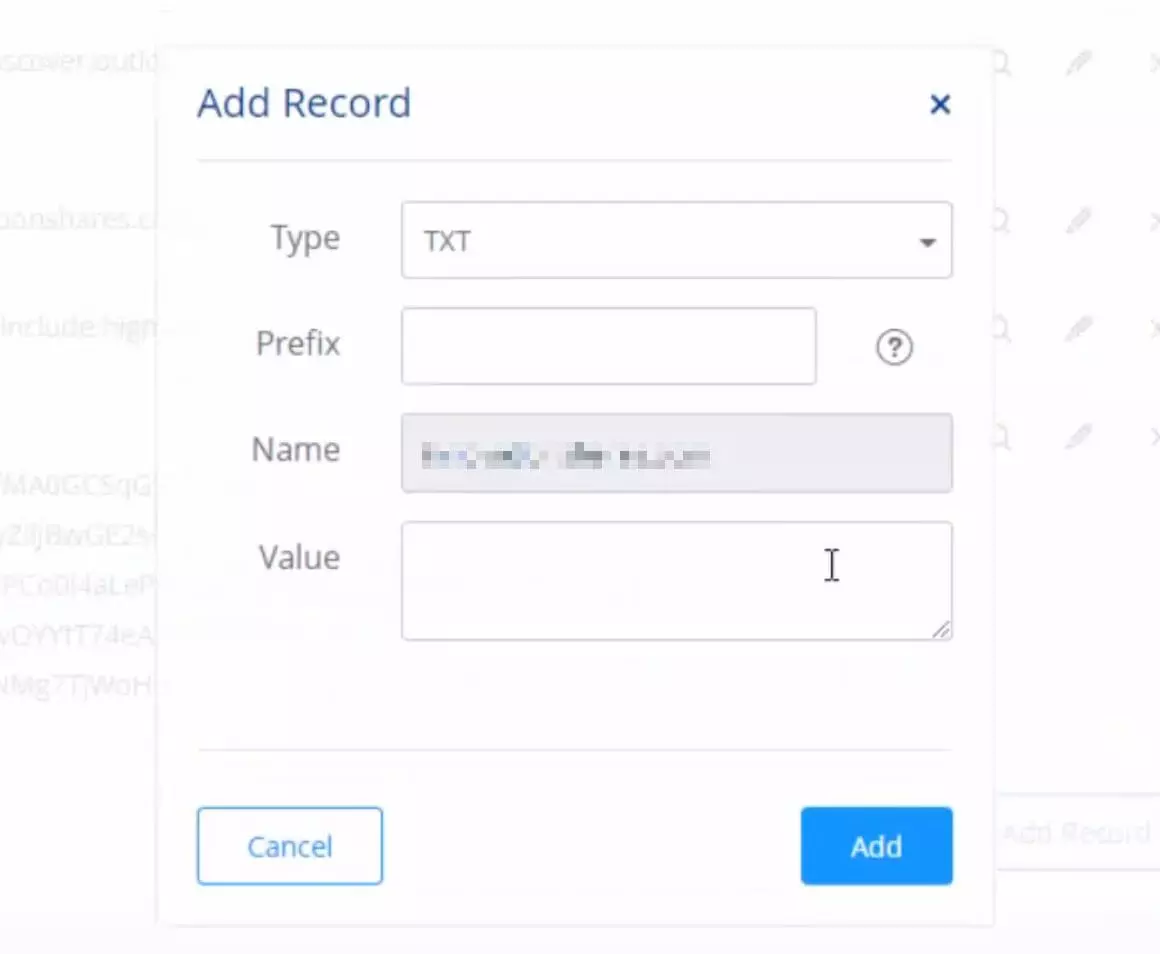
And fill in the fields:
- Type: TXT
- Prefix (Hostname): @
- Value: Copy/paste the generated record to your email provider. It should look like this:
All you have to do is register!
The creation of an SPF record is effective within 48 hours (at the latest)!
More info on the 1&1 support center 😉
1&1: Set up the DKIM record
To create a DKIM record, you must first have created a CNAME record (see above).
The procedure is the same as for the SPF -> you have to access the DNS configuration up to Add a record :

Once the dialog box opens, Add a record, then fill in the fields :
- Type: TXT
- Prefix: example._domainkey
- Value: Copy/paste the DKIM key provided by your email provider
You will find the subdomain value and DKIM key at your email provider. The path is often the same:
Settings > My Domains > DNS Management > Email Authentication.
DKIM key generators such as DKIMcore can also do the trick, but we advise you to do it at your email provider.
Record it, and it's done!
1&1: Set up the Dmarc record
To set up a DMARC signature, it is essential to have configured the DKIM beforehand.
- Type: TXT
- Prefix:
- Value:
These are classic values, but we can have fun adding some: see the Google support which explains it all 😉
It is advisable to deploy the DMARC standard progressively using the p and pct variables. See the bottom of the Google support page 😉 for more information.
GoDaddy: Configure SPF, DKIM and DMARC
GoDaddy: Configure the Custom Domain
In your GoDaddy settings, go to My Products > Domains > Manage > DNS > Manage Zones
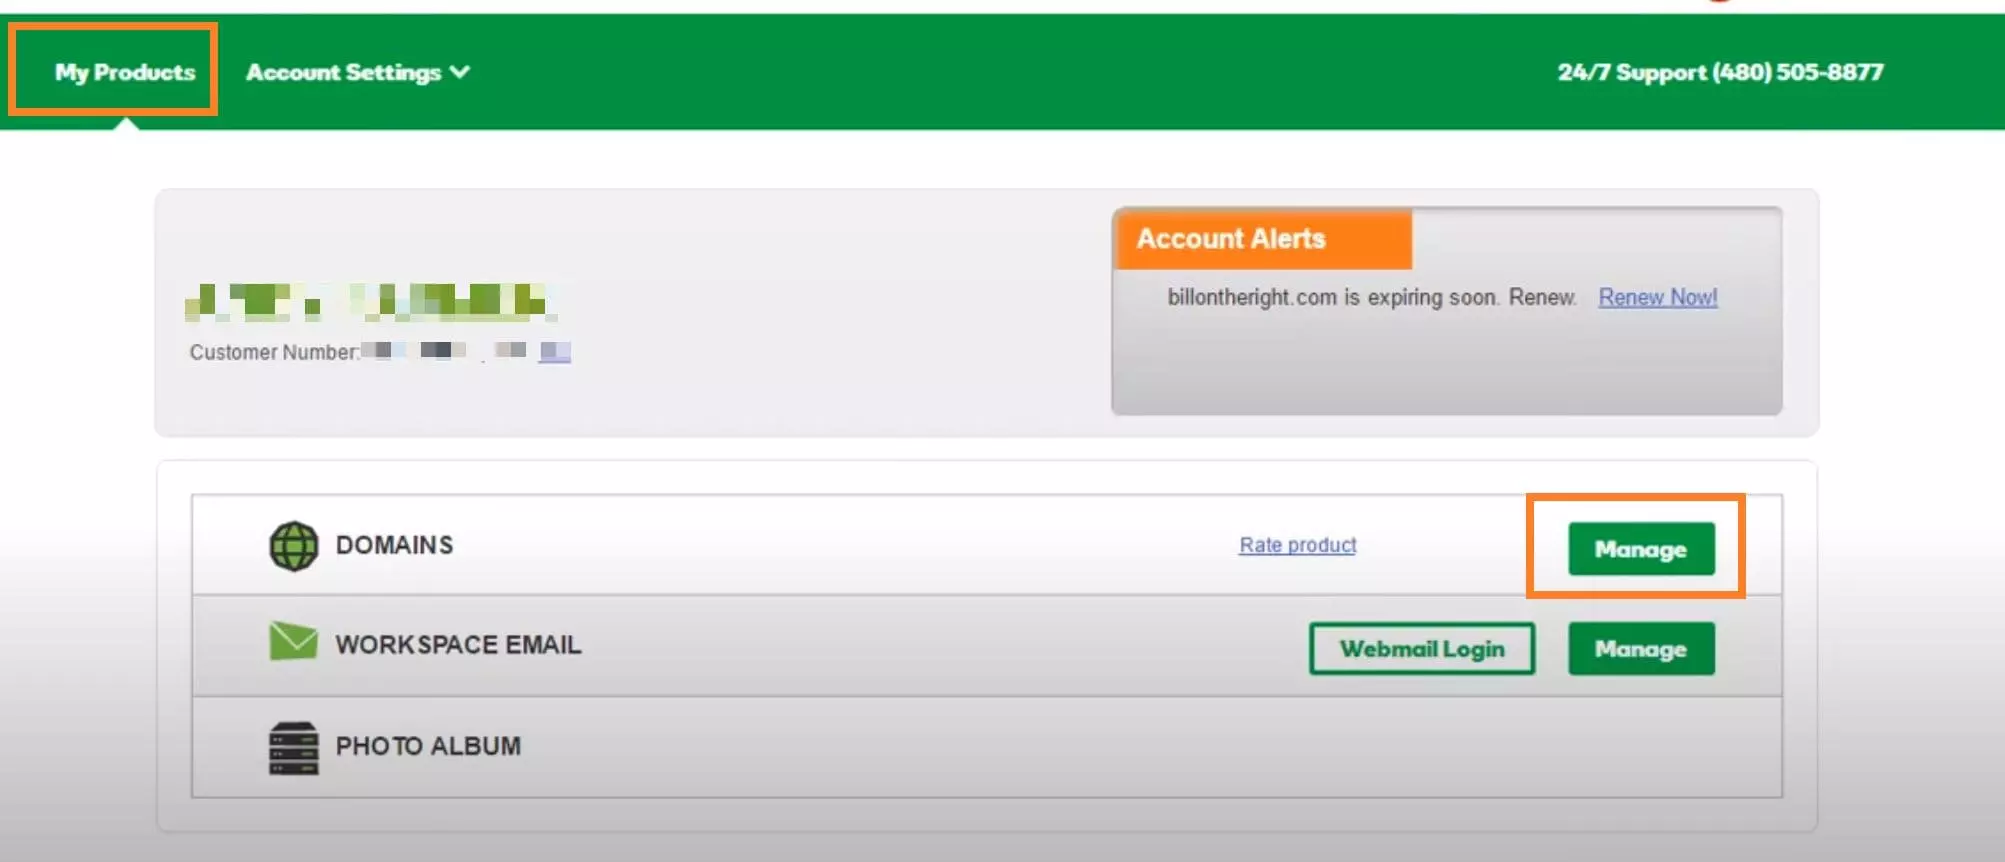

Once you have entered your DNS records, click Add and fill in the fields:
- Type: CNAME
- Host: enter the sub-domain of the URL whose alias you want (track for CNAME tracking, etc.)
- Points to: Enter the domain whose alias you want to use.
Then save it!
Now go to the Custom Domain section of your emailing service and add the CNAME record and domain name!
GoDaddy: Set up the SPF record
Access your domain management space:

Then to the management of DNS zones:

Once in the Records section, 2 possibilities:

You already have an SPF record (record starting with v=spf1)
In this case, click on the pencil at the SPF record and add the following line of text to the record :
include:spf.example.io between the last include command and the ~all command (or -allor ?all)
You can generate the SPF record with your email provider!
No SPF registration 😱. You have to create one.

Click on Add and select the TXT type from the menu, then fill in the following fields:
- Type: TXT
- Host: @
- TXT value (replace "example.io" with your domain):
You can retrieve the TXT record from your email provider to ensure this (Settings > My Domains > DNS > Email Authentication).
More info on GoDaddy support 😉
GoDaddy: Configure your DKIM signature
Remember to create a CNAME record before creating the DKIM record!
On your GoDaddy account, access your parameters:

Then to the management of DNS zones:

Then click on Add a record (or Add), at the bottom right of all your records. Fill in the fields in the dialog box that appears:
Fill in the fields:
- Type: TXT
- Host: Copy/paste the DNS hostname (_domainkey) provided by your email service
- Tip to: Copy/paste the DKIM key provided by your emailing service
- TTL: 1 hour
You will find the subdomain value and DKIM key at your email provider. The path is often the same: Settings > My Domains > DNS Management > Email Authentication
Sometimes on GoDaddy, the recording doesn't work right away and GoDaddy displays "An unexpected error occurred" when you try to save the recording. Don't panic, refresh the page and the recording will (normally) still be taken into account.
Save. That's it!
GoDaddy: Configure your DMARC signature
To set up a DMARC signature, it is essential to have configured the DKIM beforehand.
Still, in the DNS menu, choose Manage Zones and select your :

Then click Add to add a new record:

Remember to check if you already have a DMARC record before creating another one. You can only have one per domain!
Fill in the fields:
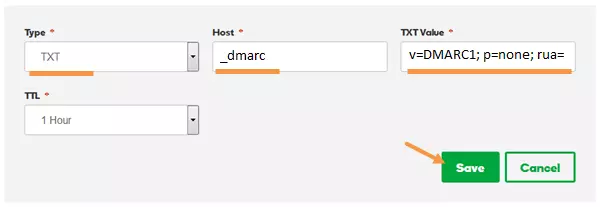
- Type: TXT
- DNS host: _dmarc.example.io (replace "example.io" with your domain)
- TXT value:
It is advisable to deploy the DMARC standard progressively using the p and pct variables. See the bottom of the Google support page 😉 for more information.
Don't forget to save... And there you are!
Namecheap: Configure your Custom domain, SPF, DKIM and DMARC
Namecheap: Configure the Custom Domain
To set up the Custom Domain, a CNAME record must be created. To do this, go to Account > Domains > choose domain > Manage > Advanced DNS > Actions :
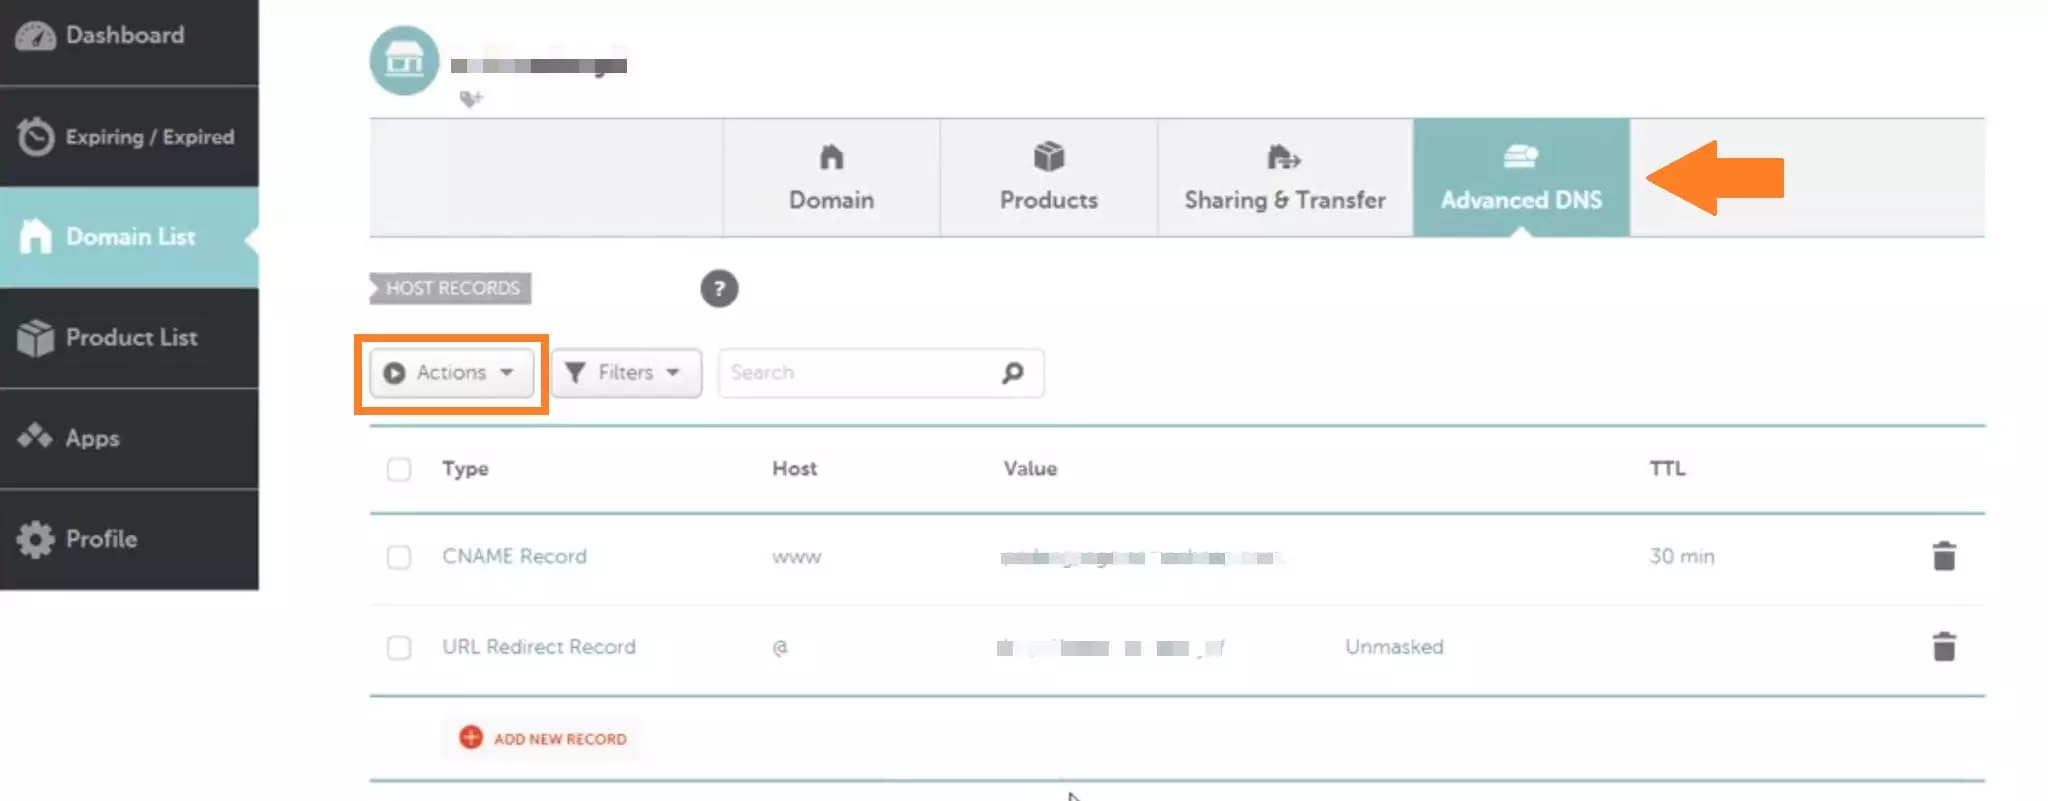
- Type: CNAME
- Host: the sub-domain you want ("track" for custom domain tracking, etc.)
- Value: the domain whose alias you want to use
Save.
The propagation time is 30 minutes at Namecheap.
After 30 minutes, go to the Custom Domain section of your emailing service and add the CNAME registration and domain name!
Namecheap: Setting up the SPF record
In your Namecheap account, go to Account > List of domains > choose the domain > Manage :
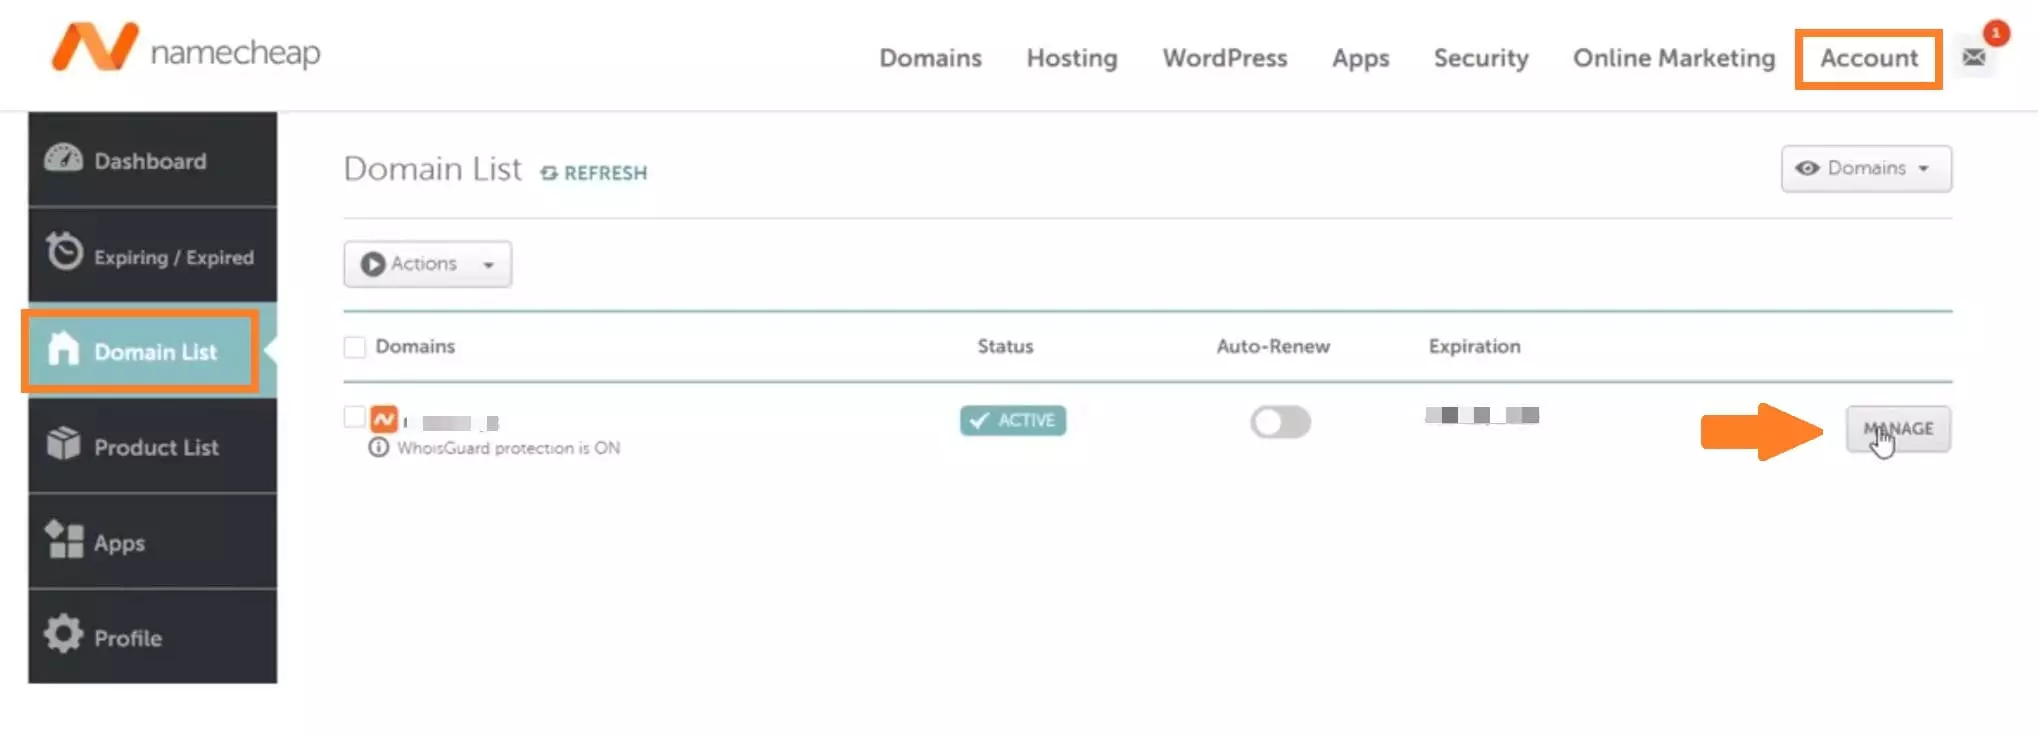
Once in the DNS management menu (Advanced DNS), 2 possibilities:
An SPF record already exists (it starts with v=spf1)
In this case, click on the value range of the SPF record and add the include rule provided by your email provider (example: include:spf.example.io) between the last includecommand and the ~all (or -all or ?all) command. Finally, save!
There is no SPF record.
In the Actions drop-down menu:

Select type TXT. Then select the type TXT:
- Host: @
- Value:
- Copy/paste the generated record to your email provider. It should look like this:
All you have to do is register!
Namecheap: configure the DKIM signature
To create a DKIM record, you must first have created a CNAME record (see above).
Still in the advanced DNS tab, select Action > TXT type :

Add a record and fill in the fields :
- Host: Copy/paste the DNS hostname (_domainkey) provided by your email service
- Value: Copy and paste the DKIM key provided by your emailing service
Then record.
You will find the subdomain value and DKIM key at your email provider. The path is often the same: Settings > My Domains > DNS Management > Email Authentication
Feel free to have a look at the Namecheap support if you want more details!
Namecheap: Setting up DMARC recording
To set up a DMARC signature, it is essential to have configured the DKIM beforehand.
Still in the advanced DNS menu, add a TXT record in Action and fill in the fields :
- Type: TXT
- Host: _dmarc.example.io (replace "example.io" with your domain)
- TXT value:
Then save the change!
It is advisable to deploy the DMARC standard progressively using the p and pct variables. See the bottom of the Google support page 😉 for more information.
Now that your domain is optimized, nothing better than a fresh and reliable contact base to move forward!
Good timing, Dropcontact verifies, cleans, and enriches your prospect files, all without a database and 100% GDPR compliant!
You want to try? The first 50 contacts are free! 🎁


