According to the 2018 Hubspot study of 6 200 people, Sales lose on average 1 hour per day on manual task management.
1 hour a day doing tasks instead of focusing on their core business: selling!
Prospecting is not only about selling your product or solution: it's searching for potential leads, finding their email, their phone number, launching email campaigns, logging on to LinkedIn, reconnect , taking notes, copy/paste, reporting...
Automating your prospecting workflow frees up time to focus on what cannot be automated: creating and maintaining strong relationships with your prospects and customers.
This tutorial will allow you to build a compelling prospecting workflow, and above all, 100% automated.
Once you set it up, a simple LinkedIn search will be enough to initiate contact.
Please fasten your seat belts. We're going to prospect!

Step 1: Create a Pipedrive account
Pipedrive is one of the leading CRM on the market and connects to many tools.
Note that in this automated workflow, we will use Pipedrive. However, you could adapt this approach to the CRM you use.
Create a Pipedrive account takes few clicks. You can test Pipedrive for free for 14 days, with full access to the features.
Step 2: Automatically import your leads from LinkedIn into Pipedrive
Dux-Soup has recently launched an integration with Pipedrive that allows you to import LinkedIn contacts into your Pipedrive in 1 click.
From a LinkedIn or Sales Navigator search, the extension allows you to visit the profiles of your search and to automatically extract information.
1. From the Pipedrive Marketplace, download the Dux-Soup Connector extension
2. In the permissions, select at least the option "Create or update Pipedrive People from LinkedIn views" to allow DuxSoup to create new records in your Pipedrive :

3. Subscribe to the Dux-Soup Turbo plan to have access to CRM integration
4. Isolate leads coming from Dux-Soup by creating a Pipedrive filter, with these two conditions:
- The LinkedIn ID field is not empty (field created specifically by Dux-Soup)
- The Email field is not empty
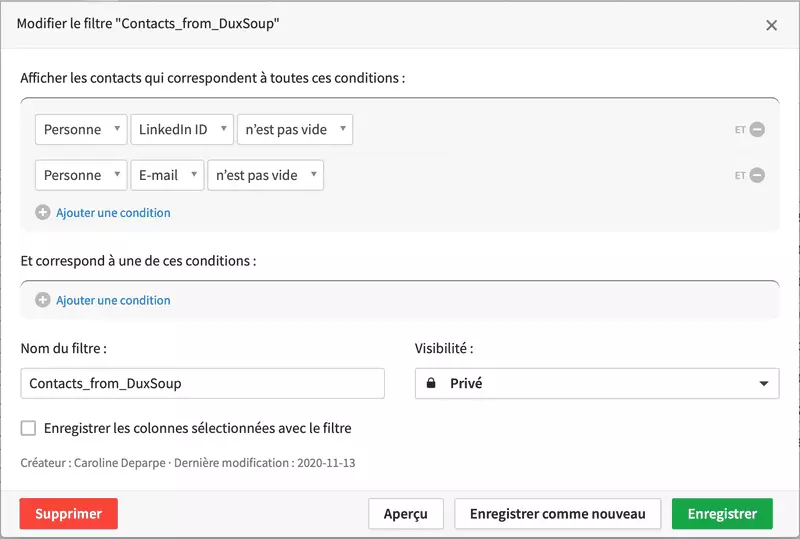
From now on, the profiles extracted with Dux-Soup are immediately exported to Pipedrive and can be identified. First connection made!
Step 3: Automatically enrich contact data
Dropcontact is integrated with Pipedrive to enrich, correct, and update contact and organization data without any human intervention. Duplicate contacts are detected and merged automatically.
Dux-Soup collected the three pieces of information that Dropcontact needs to find the contact's professional email address: first name, last name, and company website. Dropcontact must now be connected to Pipedrive to automate the enrichment:
1. Create a Dropcontact account. Registration is free and without obligation 😉
2. In the CRM Integration section, click Test 14 days. The test operates on the contact records whose first name starts with A, B, C, or D and their company records.
3. Enter the Pipedrive PLC key in Dropcontact
Emails but not only 🧐
Dropcontact adds other information such as civility, LinkedIn profile (if not filled in), business phone number, company's sector of activity, number of employees, last published turnover...
💡 Use the different fields to personalize your future Cold Emails campaigns as much as possible.
At the end of the 7-days trial, Dropcontact will enrich all your contacts automatically after subscription 😉.
Step 4: Send a cold email automatically
lemlist is a Cold Email solution that offers advanced personalization features.
The lemlist integration in Pipedrive allows you to follow the activity of your campaigns directly in your CRM 🔥
To connect lemlist and Pipedrive and create your first sequence of emails :
1. Create a lemlist account and a first campaign
2. In the Leads section, select Pipedrive and the filter created in step 2 :
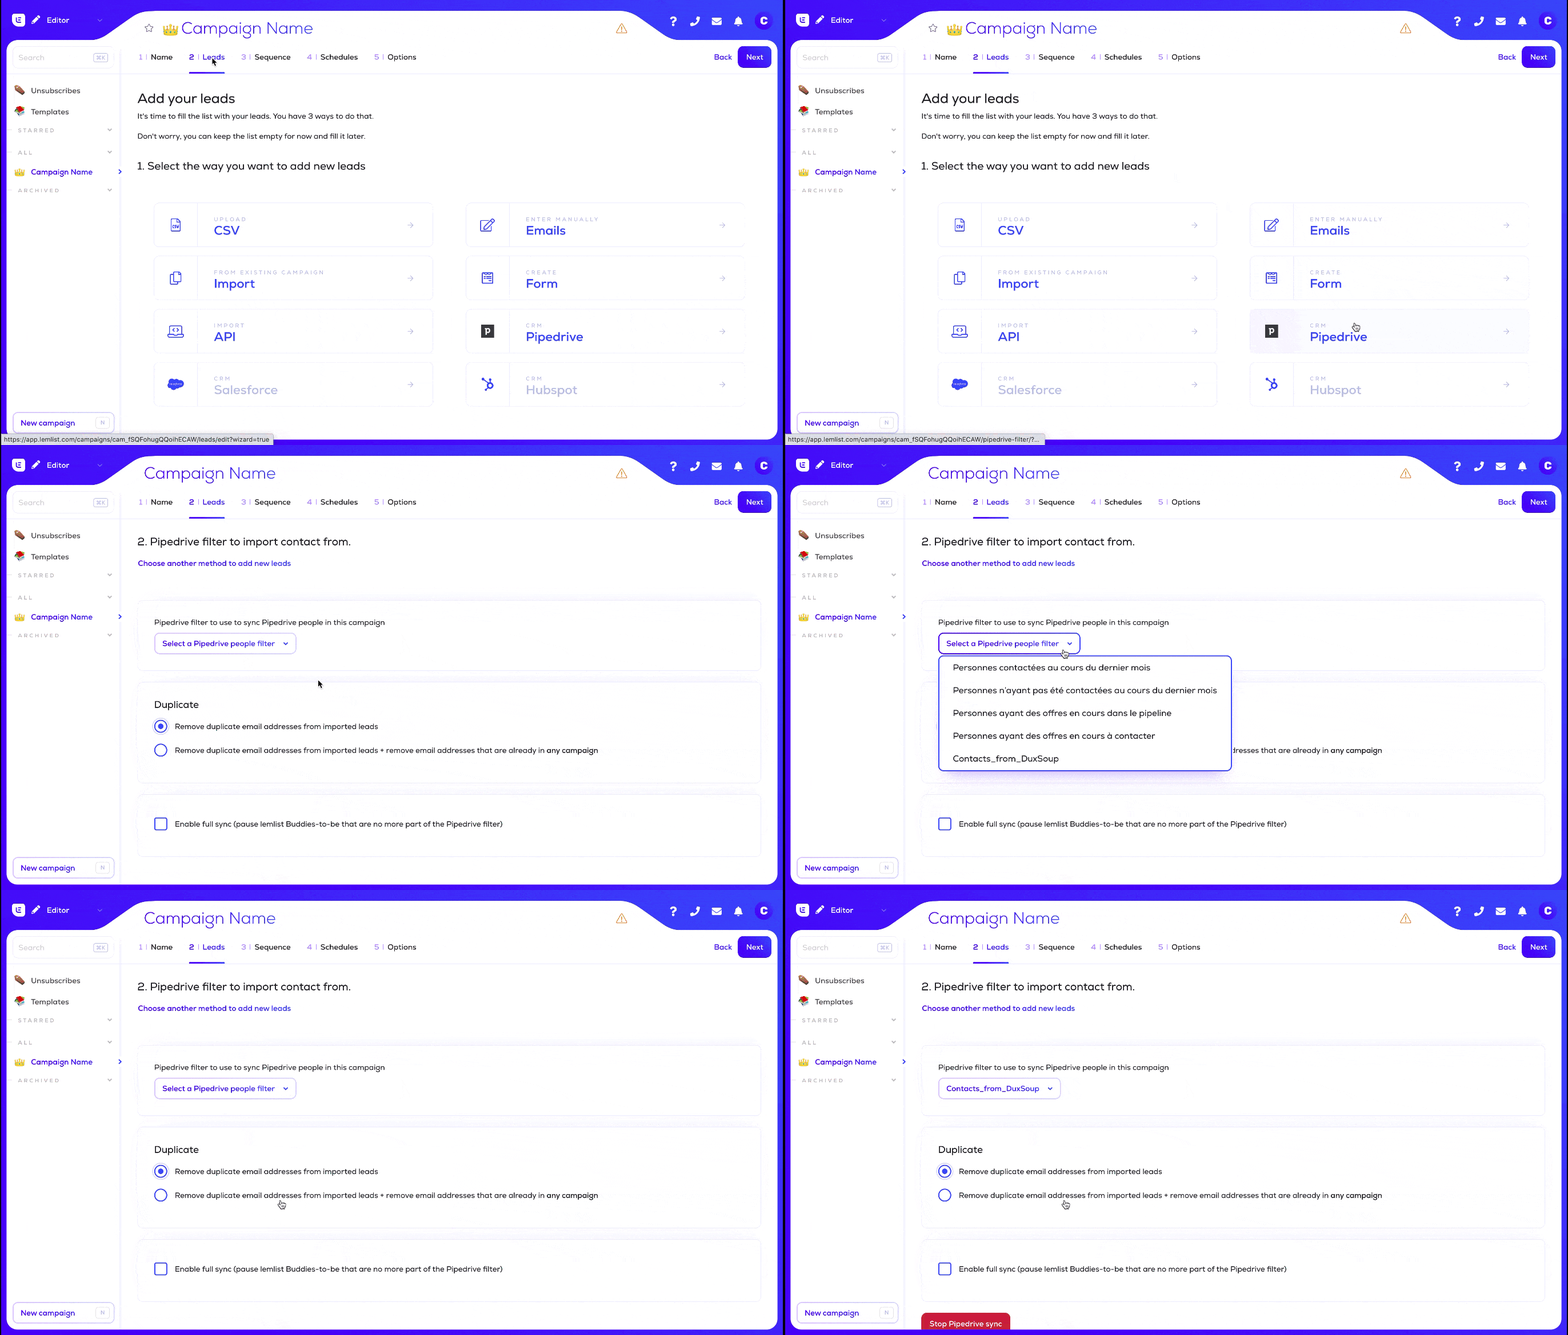
3. In the Options section, check "Review automatically new leads inserted in the leads list" so that the email will be sent automatically :

lemlist is on! Each time a new contact is imported via DuxSoup, an email will be sent to him automatically!
Step 5: Send a LinkedIn invitation after opening the email
By sending a LinkedIn invitation to prospects who have opened the Cold Email, you talk to your contact in a context.
When the prospect receives it, he remembers your product or service and can initiate the LinkedIn chat. You'll see that the conversion rates are much better 😉
To track the opening of your campaign emails, first, check in the lemlist options that the opening track is enabled and that the activity tracking in Pipedrive is active.
We will create a second Pipedrive filter to isolate the contacts from Dux-Soup who opened your Cold Email: The subject of the activity contains "opened message 1 from[Campaign name]". Add the name of the campaign created in the list between brackets.
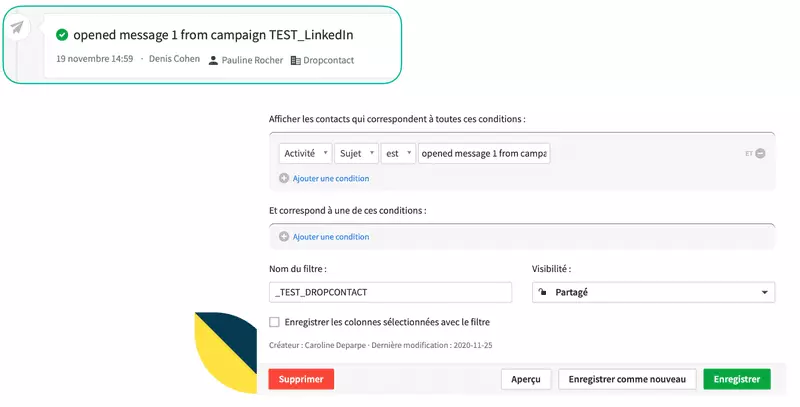
💡 If multiple emails are sent in your campaign, you can also create a filter to trigger an action when you open your second email. The subject of the activity will be "opened message 2 from[Campaign name]".
Leads that have opened your email will meet the filter's requirements. Thanks to Zapier, we will push these contacts into Google Sheets.
1. Create a Zapier account.
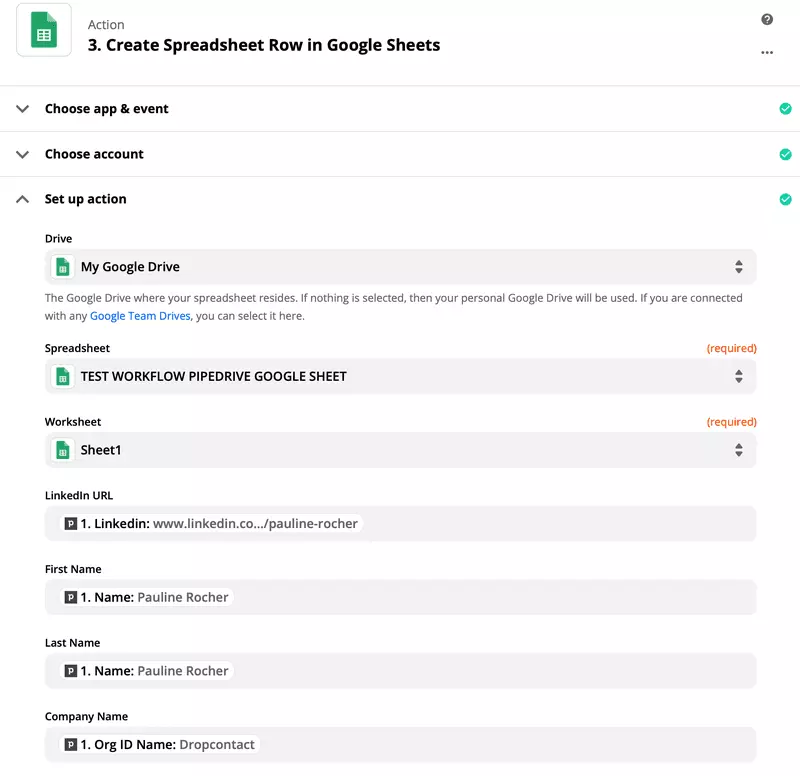
2. Create a blank Google Sheet with 4 headers: Linkedin URL of the contact, First Name, Last Name, Company.

3. Create a Zap from Pipedrive to Google Sheet. Then select the Person Matching Filter trigger for Pipedrive.
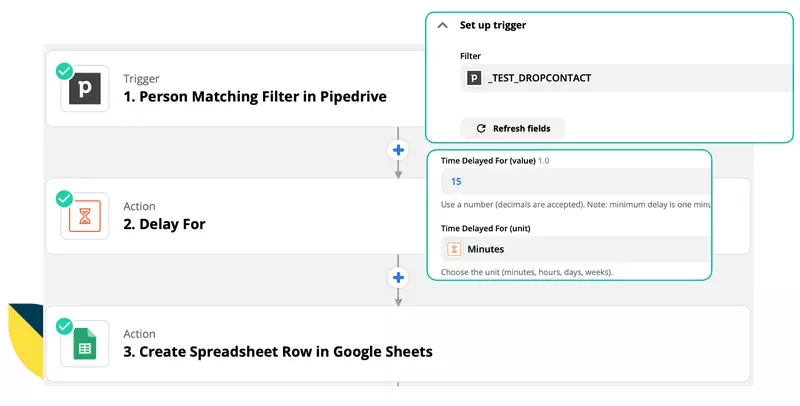
4. To control the time between the opening of the email and the sending of the LinkedIn invitation, add a zap Delay here. Customize the time you want in minutes
5. Check the different fields for Google Sheets :
💡 Remember to test each step of your zap, then test the whole.
The list will now update dynamically. With Phantombuster, we will automate the sending of personalized LinkedIn invitations to these contacts.
1. Create a Phantombuster account
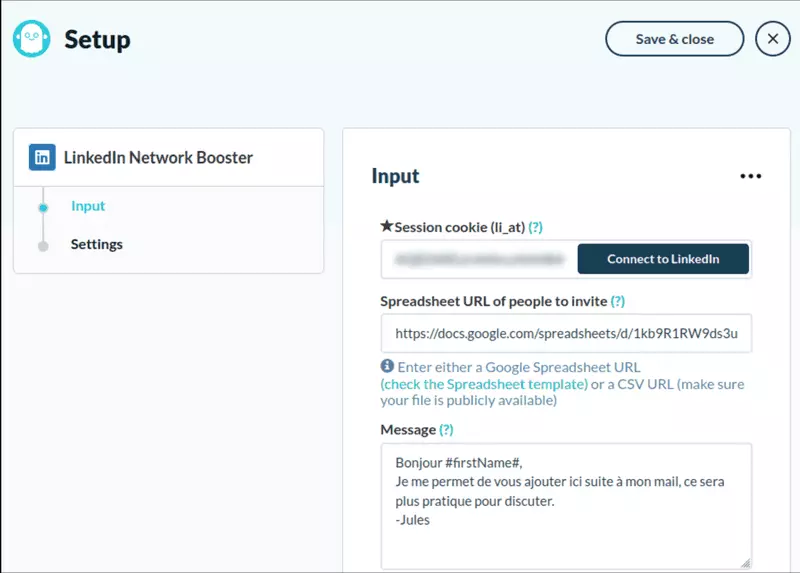
2. Select the LinkedIn Network Booster phantom
3. Log in to your LinkedIn account.
4. Copy/paste the URL of the Google Sheet without forgetting to make it public so that Phantombuster can access it.
5. Add a login message
6. In the Settings, select automatic sending, and select a launch every "working hour.

💡 Customize your login message using the #firstName#, #lastName#, and #company# variables.
Step 6: Launch the workflow by doing a simple LinkedIn search on your target
Now you have built the machine, all you have to do is give it some raw material.
Define your target using multiple filters: Job Name, Geographical Region, Industry, Languages... You cannot retrieve more than 1000 profiles per search. Refine your search if you have too many results.
💡 Use the negative filters! In this example, we are looking for marketing decision-makers:
[Marketing AND (CMO OR "Head of" OR Director ) NOT (Alternating OR Internship OR Internship OR Alternating OR Investor OR Assistant OR Assistant)]
Visit your "search profiles" with the Dux-Soup extension to import them into your Pipedrive :

Visited prospects will receive a Cold Email, then a LinkedIn invitation when they open it... In 1 click! 🤩
You can now focus on building relationships with these new leads without going through the initial contact stage.
To go further, discover more tips and tricks to automate your prospecting with Pipedrive in our webinar below 👇.


